Close
升级到 Vue 3 | Vue 2 EOL

渲染函数和 JSX

基础

Vue 建议在绝大多数情况下使用模板来构建您的 HTML。但是,在某些情况下,您确实需要 JavaScript 的全部编程能力。这时您可以使用 **渲染函数**,它是一种更接近编译器的模板替代方案。

让我们深入了解一个简单的示例,其中 `render` 函数将很实用。假设您想要生成带锚点的标题

<h1>
<a name="hello-world" href="#hello-world">
Hello world!
</a>
</h1>

对于上面的 HTML,您决定想要这个组件接口

<anchored-heading :level="1">Hello world!</anchored-heading>

当您开始使用一个仅根据 `level` prop 生成标题的组件时,您很快就会得到这个

<script type="text/x-template" id="anchored-heading-template">
<h1 v-if="level === 1">
<slot></slot>
</h1>
<h2 v-else-if="level === 2">
<slot></slot>
</h2>
<h3 v-else-if="level === 3">
<slot></slot>
</h3>
<h4 v-else-if="level === 4">
<slot></slot>
</h4>
<h5 v-else-if="level === 5">
<slot></slot>
</h5>
<h6 v-else-if="level === 6">
<slot></slot>
</h6>
</script>
Vue.component('anchored-heading', {
template: '#anchored-heading-template',
props: {
level: {
type: Number,
required: true
}
}
})

该模板感觉不太好。它不仅冗长,而且我们为每个标题级别都重复了 `<slot></slot>`,并且在添加锚点元素时也必须这样做。

虽然模板非常适合大多数组件,但很明显,这不是其中之一。所以让我们尝试用 `render` 函数重写它

Vue.component('anchored-heading', {
render: function (createElement) {
return createElement(
'h' + this.level, // tag name
this.$slots.default // array of children
)
},
props: {
level: {
type: Number,
required: true
}
}
})

简单多了!有点。代码更短,但也需要对 Vue 实例属性有更多的了解。在这种情况下,您必须知道,当您将没有 `v-slot` 指令的子元素传递到组件中时,例如 `anchored-heading` 中的 `Hello world!`,这些子元素将存储在组件实例的 `$slots.default` 上。如果您还没有,**建议您在深入了解渲染函数之前阅读一下 实例属性 API。**

节点、树和虚拟 DOM

在我们深入了解渲染函数之前,了解一下浏览器的工作原理很重要。例如,以下 HTML

<div>
<h1>My title</h1>
Some text content
<!-- TODO: Add tagline -->
</div>

当浏览器读取此代码时,它会构建一个 “DOM 节点树” 来帮助它跟踪所有内容,就像您构建家谱来跟踪您的大家庭一样。

上面 HTML 的 DOM 节点树如下所示

DOM Tree Visualization

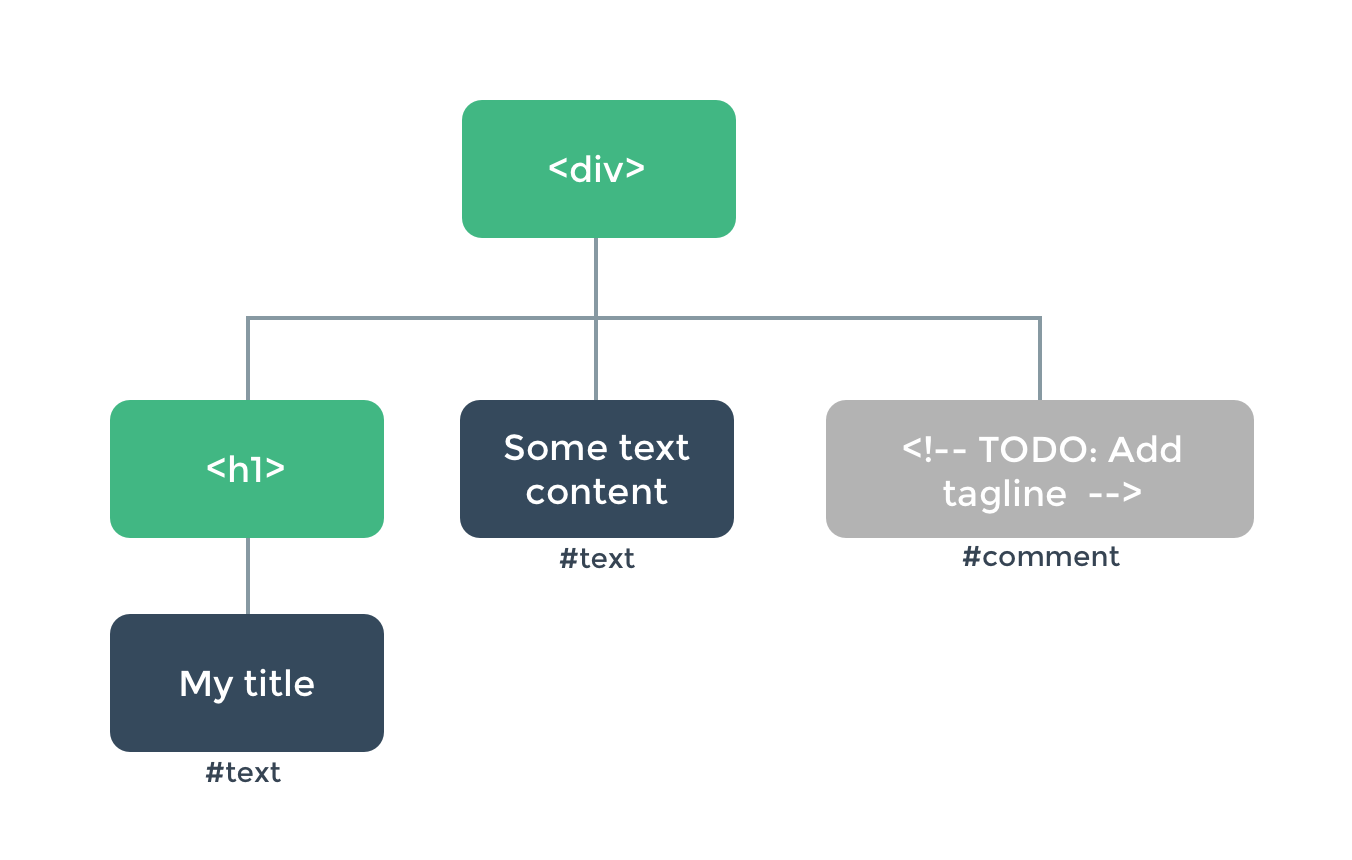
每个元素都是一个节点。每段文本都是一个节点。甚至注释也是节点!节点只是页面的一部分。就像家谱一样,每个节点都可以有子节点(即每个部分都可以包含其他部分)。

有效地更新所有这些节点可能很困难,但幸运的是,您永远不必手动执行此操作。相反,您告诉 Vue 您想要在页面上显示的 HTML,在模板中

<h1>{{ blogTitle }}</h1>

或渲染函数中

render: function (createElement) {
return createElement('h1', this.blogTitle)
}

在这两种情况下,Vue 都会自动保持页面更新,即使 `blogTitle` 发生变化。

虚拟 DOM

Vue 通过构建一个 **虚拟 DOM** 来跟踪它需要对真实 DOM 进行的更改来实现这一点。仔细看看这行代码

return createElement('h1', this.blogTitle)

createElement 到底返回了什么?它并不完全是真实的 DOM 元素。也许更准确地说,它应该被命名为 `createNodeDescription`,因为它包含描述 Vue 应该在页面上渲染什么类型的节点的信息,包括对任何子节点的描述。我们将这种节点描述称为“虚拟节点”,通常缩写为 **VNode**。“虚拟 DOM”是我们对由 Vue 组件树构建的整个 VNode 树的称呼。

createElement 参数

接下来您需要熟悉的是如何在 `createElement` 函数中使用模板功能。以下是 `createElement` 接受的参数

// @returns {VNode}
createElement(
// {String | Object | Function}
// An HTML tag name, component options, or async
// function resolving to one of these. Required.
'div',

// {Object}
// A data object corresponding to the attributes
// you would use in a template. Optional.
{
// (see details in the next section below)
},

// {String | Array}
// Children VNodes, built using `createElement()`,
// or using strings to get 'text VNodes'. Optional.
[
'Some text comes first.',
createElement('h1', 'A headline'),
createElement(MyComponent, {
props: {
someProp: 'foobar'
}
})
]
)

数据对象深入

需要注意的一点是:类似于 `v-bind:class` 和 `v-bind:style` 在模板中具有特殊处理,它们在 VNode 数据对象中也有自己的顶级字段。此对象还允许您绑定普通的 HTML 属性以及 DOM 属性,例如 `innerHTML`(这将替换 `v-html` 指令)

{
// Same API as `v-bind:class`, accepting either
// a string, object, or array of strings and objects.
class: {
foo: true,
bar: false
},
// Same API as `v-bind:style`, accepting either
// a string, object, or array of objects.
style: {
color: 'red',
fontSize: '14px'
},
// Normal HTML attributes
attrs: {
id: 'foo'
},
// Component props
props: {
myProp: 'bar'
},
// DOM properties
domProps: {
innerHTML: 'baz'
},
// Event handlers are nested under `on`, though
// modifiers such as in `v-on:keyup.enter` are not
// supported. You'll have to manually check the
// keyCode in the handler instead.
on: {
click: this.clickHandler
},
// For components only. Allows you to listen to
// native events, rather than events emitted from
// the component using `vm.$emit`.
nativeOn: {
click: this.nativeClickHandler
},
// Custom directives. Note that the `binding`'s
// `oldValue` cannot be set, as Vue keeps track
// of it for you.
directives: [
{
name: 'my-custom-directive',
value: '2',
expression: '1 + 1',
arg: 'foo',
modifiers: {
bar: true
}
}
],
// Scoped slots in the form of
// { name: props => VNode | Array<VNode> }
scopedSlots: {
default: props => createElement('span', props.text)
},
// The name of the slot, if this component is the
// child of another component
slot: 'name-of-slot',
// Other special top-level properties
key: 'myKey',
ref: 'myRef',
// If you are applying the same ref name to multiple
// elements in the render function. This will make `$refs.myRef` become an
// array
refInFor: true
}

完整示例

有了这些知识,我们现在可以完成我们开始的组件

var getChildrenTextContent = function (children) {
return children.map(function (node) {
return node.children
? getChildrenTextContent(node.children)
: node.text
}).join('')
}

Vue.component('anchored-heading', {
render: function (createElement) {
// create kebab-case id
var headingId = getChildrenTextContent(this.$slots.default)
.toLowerCase()
.replace(/\W+/g, '-')
.replace(/(^-|-$)/g, '')

return createElement(
'h' + this.level,
[
createElement('a', {
attrs: {
name: headingId,
href: '#' + headingId
}
}, this.$slots.default)
]
)
},
props: {
level: {
type: Number,
required: true
}
}
})

约束

VNode 必须是唯一的

组件树中的所有 VNode 必须是唯一的。这意味着以下渲染函数无效

render: function (createElement) {
var myParagraphVNode = createElement('p', 'hi')
return createElement('div', [
// Yikes - duplicate VNodes!
myParagraphVNode, myParagraphVNode
])
}

如果您真的想多次复制相同的元素/组件,可以使用工厂函数。例如,以下渲染函数是渲染 20 个相同段落的有效方法

render: function (createElement) {
return createElement('div',
Array.apply(null, { length: 20 }).map(function () {
return createElement('p', 'hi')
})
)
}

用纯 JavaScript 替换模板功能

v-ifv-for

只要可以用纯 JavaScript 轻松完成,Vue 渲染函数就不会提供专有的替代方案。例如,在使用 `v-if` 和 `v-for` 的模板中

<ul v-if="items.length">
<li v-for="item in items">{{ item.name }}</li>
</ul>
<p v-else>No items found.</p>

这可以用 JavaScript 的 `if`/`else` 和 `map` 在渲染函数中重写

props: ['items'],
render: function (createElement) {
if (this.items.length) {
return createElement('ul', this.items.map(function (item) {
return createElement('li', item.name)
}))
} else {
return createElement('p', 'No items found.')
}
}

v-model

渲染函数中没有直接的 `v-model` 对应物 - 您需要自己实现逻辑

props: ['value'],
render: function (createElement) {
var self = this
return createElement('input', {
domProps: {
value: self.value
},
on: {
input: function (event) {
self.$emit('input', event.target.value)
}
}
})
}

这是降低级别带来的成本,但它也让您比 `v-model` 更好地控制交互细节。

事件和键修饰符

对于 `passive`、`capture` 和 `once` 事件修饰符,Vue 提供了可以与 `on` 一起使用的前缀

修饰符 前缀
.passive &
.capture !
.once ~
.capture.once
.once.capture
~!

例如

on: {
'!click': this.doThisInCapturingMode,
'~keyup': this.doThisOnce,
'~!mouseover': this.doThisOnceInCapturingMode
}

对于所有其他事件和键修饰符,不需要专有的前缀,因为您可以在处理程序中使用事件方法

修饰符 处理程序中的等效项
.stop event.stopPropagation()
.prevent event.preventDefault()
.self if (event.target !== event.currentTarget) return

.enter.13
if (event.keyCode !== 13) return(将 `13` 更改为 另一个键码 以获得其他键修饰符)
修饰符键
.ctrl.alt.shift.meta
if (!event.ctrlKey) return(将 `ctrlKey` 分别更改为 `altKey`、`shiftKey` 或 `metaKey`)

以下是一个将所有这些修饰符一起使用的示例

on: {
keyup: function (event) {
// Abort if the element emitting the event is not
// the element the event is bound to
if (event.target !== event.currentTarget) return
// Abort if the key that went up is not the enter
// key (13) and the shift key was not held down
// at the same time
if (!event.shiftKey || event.keyCode !== 13) return
// Stop event propagation
event.stopPropagation()
// Prevent the default keyup handler for this element
event.preventDefault()
// ...
}
}

插槽

您可以从 this.$slots 中访问静态插槽内容作为 VNode 数组

render: function (createElement) {
// `<div><slot></slot></div>`
return createElement('div', this.$slots.default)
}

并从 this.$scopedSlots 中访问作用域插槽作为返回 VNode 的函数

props: ['message'],
render: function (createElement) {
// `<div><slot :text="message"></slot></div>`
return createElement('div', [
this.$scopedSlots.default({
text: this.message
})
])
}

要使用渲染函数将作用域插槽传递给子组件,请在 VNode 数据中使用 `scopedSlots` 字段

render: function (createElement) {
// `<div><child v-slot="props"><span>{{ props.text }}</span></child></div>`
return createElement('div', [
createElement('child', {
// pass `scopedSlots` in the data object
// in the form of { name: props => VNode | Array<VNode> }
scopedSlots: {
default: function (props) {
return createElement('span', props.text)
}
}
})
])
}

JSX

如果您编写了大量的 `render` 函数,您可能会觉得编写以下内容很痛苦

createElement(
'anchored-heading', {
props: {
level: 1
}
}, [
createElement('span', 'Hello'),
' world!'
]
)

尤其是在模板版本相比之下如此简单的情况下

<anchored-heading :level="1">
<span>Hello</span> world!
</anchored-heading>

这就是为什么有一个 Babel 插件 来在 Vue 中使用 JSX,让我们回到更接近模板的语法

import AnchoredHeading from './AnchoredHeading.vue'

new Vue({
el: '#demo',
render: function (h) {
return (
<AnchoredHeading level={1}>
<span>Hello</span> world!
</AnchoredHeading>
)
}
})

将 `createElement` 缩写为 `h` 是您在 Vue 生态系统中会看到的常见约定,实际上它是 JSX 所必需的。从 3.4.0 版本 开始,Vue 的 Babel 插件会在任何使用 ES2015 语法声明的具有 JSX 的方法和 getter(而不是函数或箭头函数)中自动注入 `const h = this.$createElement`,因此您可以省略 `(h)` 参数。在插件的早期版本中,如果 `h` 在作用域中不可用,您的应用程序会抛出错误。

有关 JSX 如何映射到 JavaScript 的更多信息,请参阅 使用文档

函数式组件

我们之前创建的带锚点的标题组件相对简单。它不管理任何状态,不监视传递给它的任何状态,并且没有生命周期方法。实际上,它只是一个带有某些 props 的函数。

在这种情况下,我们可以将组件标记为 `functional`,这意味着它们是无状态的(没有 响应式数据)并且无实例的(没有 `this` 上下文)。**函数式组件** 如下所示

Vue.component('my-component', {
functional: true,
// Props are optional
props: {
// ...
},
// To compensate for the lack of an instance,
// we are now provided a 2nd context argument.
render: function (createElement, context) {
// ...
}
})

注意:在 2.3.0 之前的版本中,如果你希望在函数式组件中接受 props,则需要 props 选项。在 2.3.0+ 中,你可以省略 props 选项,组件节点上的所有属性将被隐式地提取为 props。

当与函数式组件一起使用时,引用将是 HTMLElement,因为它们是无状态且无实例的。

在 2.5.0+ 中,如果你使用的是 单文件组件,基于模板的函数式组件可以用

<template functional>
</template>

组件所需的一切都通过 context 传递,它是一个包含以下内容的对象:

在添加 functional: true 后,更新我们锚定标题组件的渲染函数需要添加 context 参数,将 this.$slots.default 更新为 context.children,然后将 this.level 更新为 context.props.level

由于函数式组件只是函数,因此它们的渲染成本要低得多。

它们也作为包装组件非常有用。例如,当你需要

这是一个 smart-list 组件的示例,它根据传递给它的 props 委托给更具体的组件

var EmptyList = { /* ... */ }
var TableList = { /* ... */ }
var OrderedList = { /* ... */ }
var UnorderedList = { /* ... */ }

Vue.component('smart-list', {
functional: true,
props: {
items: {
type: Array,
required: true
},
isOrdered: Boolean
},
render: function (createElement, context) {
function appropriateListComponent () {
var items = context.props.items

if (items.length === 0) return EmptyList
if (typeof items[0] === 'object') return TableList
if (context.props.isOrdered) return OrderedList

return UnorderedList
}

return createElement(
appropriateListComponent(),
context.data,
context.children
)
}
})

将属性和事件传递给子元素/组件

在普通组件中,未定义为 props 的属性会自动添加到组件的根元素,替换或 智能合并 任何具有相同名称的现有属性。

但是,函数式组件要求你明确定义此行为

Vue.component('my-functional-button', {
functional: true,
render: function (createElement, context) {
// Transparently pass any attributes, event listeners, children, etc.
return createElement('button', context.data, context.children)
}
})

通过将 context.data 作为第二个参数传递给 createElement,我们正在传递 my-functional-button 上使用的任何属性或事件监听器。事实上,它是如此透明,以至于事件甚至不需要 .native 修饰符。

如果你使用的是基于模板的函数式组件,你还必须手动添加属性和监听器。由于我们可以访问单个上下文内容,我们可以使用 data.attrs 传递任何 HTML 属性,并使用 listeners (data.on 的别名) 传递任何事件监听器。

<template functional>
<button
class="btn btn-primary"
v-bind="data.attrs"
v-on="listeners"
>
<slot/>
</button>
</template>

slots() vs children

你可能想知道为什么我们需要 slots()childrenslots().default 不应该与 children 相同吗?在某些情况下,是的 - 但如果你有一个具有以下子节点的函数式组件呢?

<my-functional-component>
<p v-slot:foo>
first
</p>
<p>second</p>
</my-functional-component>

对于此组件,children 将为你提供两个段落,slots().default 将只为你提供第二个段落,而 slots().foo 将只为你提供第一个段落。因此,拥有 childrenslots() 使你能够选择此组件是否了解 slot 系统,或者是否通过传递 children 将此责任委托给另一个组件。

模板编译

你可能想知道 Vue 的模板实际上是编译成渲染函数的。这是一个你通常不需要知道的实现细节,但如果你想了解特定模板功能是如何编译的,你可能会发现它很有趣。下面是一个使用 Vue.compile 实时编译模板字符串的小演示